Quick Start
This guide will walk you through setting up your first dxflow engine and running a simple workflow in under 10 minutes.
Step 1: Verify Installation
First, confirm that dxflow is properly installed:
dxflow --version
You should see output similar to:
dxflow version v1.0.0
Step 2: Start the Engine
Launch your dxflow engine with different modes:
Basic Start (Foreground Mode)
dxflow boot up
Engine successfully booted (use 'CTRL+C' to stop) [~/.dxflow/unix.sock] [0.0.0.0:80]Advanced Boot Options
Run as daemon (Linux only):
dxflow boot up --daemon
Enable HTTPS:
dxflow boot up --https
Hub mode with subdomain allocation:
dxflow boot up --proxy
Bridge mode (connect to hub):
dxflow boot up --bridge
--proxy and --bridge are mutually exclusive. Use --proxy to make this instance a hub, or --bridge to connect to an existing hub.To learn more about boot modes and flags, see the Advanced Boot Configuration for comprehensive details about all boot options, network architectures, and deployment patterns.
Step 3: Access the Web Interface
With the engine running, open your web browser and navigate to:
- Local access:
http://localhost - Remote access:
http://<your-server-ip>
You should see the dxflow web interface:
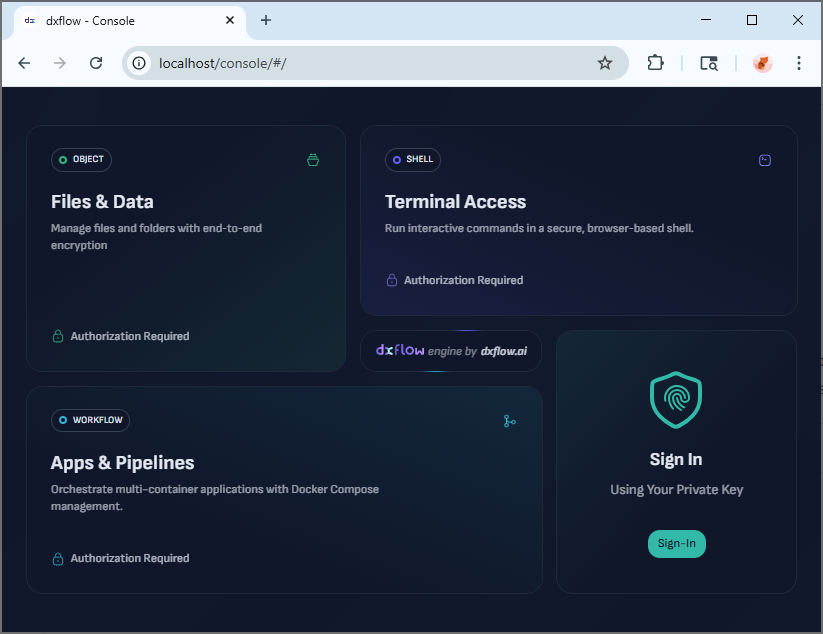
Step 4: Explore the Interface
The dxflow web interface provides four main sections for managing your workflows, files, and system resources.
Step 5: Create Your First Workflow
Let's create a simple "Hello World" workflow using Docker Compose:
5.1 Using the Web Interface
- Navigate to the Workflows section
- Click "Create Workflow"
- Name your workflow:
hello-world - Use this simple Docker Compose configuration:
version: '3.8'
services:
  hello:
    image: hello-world
    container_name: dxflow-hello
- Click "Create" to save the workflow
5.2 Using the CLI
Alternatively, create the workflow via command line:
First, create a Docker Compose file:
# hello-compose.yml
version: '3.8'
services:
  hello:
    image: hello-world
    container_name: dxflow-hello
Then create the workflow using the CLI:
# Create the workflow
dxflow workflow compose create --identity hello-world hello-compose.yml
Step 6: Run the Workflow
Start the Workflow
Web Interface: Click the "Start" button next to your workflow
CLI: Use the command line:
dxflow workflow compose start hello-world
Monitor Progress
View Logs:
dxflow workflow compose logs hello-world
Check Status:
dxflow workflow compose list
Step 7: Explore Advanced Features
Now that you have a basic workflow running, explore additional capabilities:
File Management
# Upload files
dxflow fs upload <local-path> <remote-path>

# Download files
dxflow fs download <remote-path> <local-path>

# Create ZIP archives
dxflow fs zip <source-path> <archive-name>

# Share files
dxflow fs share <file-path>
Shell Operations
# Create a shell session
dxflow shell create <session-name>

# Connect to shell
dxflow shell connect <session-name>

# List shells
dxflow shell list
Engine Management
# Check health
dxflow healthcheck

# View statistics
dxflow stat

# Update engine
dxflow engine update

# Generate auth token
dxflow engine token
Bridge & Proxy Features
# List bridges
dxflow bridge list

# Create proxy subdomain
dxflow proxy list
Key Management
# Generate RSA key pair
dxflow key generate

# Register key
dxflow key register <public-key>

# List registered keys
dxflow key list
Next Steps
🎉 Congratulations! You've successfully set up dxflow and created your first workflow.
Continue Learning
- CLI Reference - Master all available commands
- API Documentation - Integrate with your applications
- Advanced Topics - Explore performance optimization and enterprise patterns
Troubleshooting
Engine fails to start:
- Check if port 80 is already in use
- Verify you have proper permissions
- Check system logs for specific errors
Web interface not accessible:
- Verify the engine is running:
dxflow ping - Check firewall settings allow port 80
- Ensure you're accessing the correct IP address
Workflow creation fails:
- Validate your Docker Compose syntax
- Ensure Docker is installed and running
- Check container image availability
Happy computing with dxflow! 🚀
Installation
dxflow is a cross-platform tool, which means it can run on any operating system, such as Linux, macOS, and Windows. It is designed to be easy to install and use, with a simple command-line interface (CLI) and a web-based user interface (UI).
User Interface
Web-based interface for managing dxflow workflows, tasks, and resources with an intuitive and user-friendly design